Wednesday, April 13, 2022

ABC CHRISTMAS CHALLENGE -- H - HO HO HO (SANTA) AND I - INKY -- APRIL 13, 2022

Hello, and welcome back to my blog!  It's the 2nd Wednesday of the month, and that means a new challenge at ABC Christmas!  The letters of the alphabet we are creating for this month are:

H - HO HO HO (Santa)
I - Inky

I used both themes on the 2 cards I created, and here they are:


I created the kraft card first, and I must say that it's the quickest card I have made in a long time!  I was grabbing my bin of Lawn Fawn stamps off the shelf, when I came across this card I had received from a coworker this past Christmas.  These 3 bold "HO's" were absolutely PERFECT!  I found a Spellbinders classic square die that fit, and cut them all out.  They did need a bit of dressing up though, so I grabbed a scrap of kraft cardstock and the appropriate Spellbinders scalloped square die and created 3 matting layers.  After gluing the pieces together, I placed them onto a kraft card base, but it definitely looked too plain.  I rummaged through my embossing folders and found this one.  I *think* it came from Michael's, but since it is not labeled I'm not sure.  I couldn't emboss the actually card base, so I grabbed out another piece of kraft the size of the 4.25 x 5.5" card base, and ran it through my Cuttlebug.  The folder made a very nice impression, but I wanted to enhance it some by adding white pigment ink over the raised areas.  Then I just adhered the 3 HO'S with foam tape, and that card was done!  I never had a plan for it at all, and it was done lickety-split!  Why can't they all be like that?

My second card took a bit longer.  Again, I was looking for something else when I came across this clear treat bag I had saved from Christmas.  I knew I was saving it for a flat shaker, so I thought "Why not?"  At first I thought that I could make it into a slimline since the bag was clearly long enough, but after doing some measuring, I discovered that wasn't going to work.  There is a HUGE "Merry Christmas" that was way too big to fit on a slimline.  So I improvised by using just the part of the bag underneath the words, which left me with a piece big enough to make my shaker a 4.25" square.  You can't tell at all in the photo, thanks to how the sequins are positioned, but the green cardstock was ink blended using Lucky Clover and Cracked Pistachio oxides.  Those 2 make such a pretty blend! 😍  I will definitely do that again sometime!  For my shaker bits, I pulled out some Sparkle Blends from Doodles Paper Playground.  They are:

Minter Is Coming
Merry Mint
Holly Berry
Old St. Nick
and 
Oh Christmas Tree

I emptied some of each out into some containers and used my jewel picker to pick out the pieces from each blend that I wanted in my shaker.  I also grabbed some miscellaneous green sequins and silver stars from my stash to round out the shaker bits.  I try to be more sparing with the Sparkle Blends since they are only made in small batches and don't always last long in Amber's shop!  I closed up my shaker and adhered it to a mat of plain white cardstock.  Then I spent some time trying to decide between 2 papers from the Perfectly Plaid Christmas 6x6 paper pad from Lawn Fawn.  I finally settled on this one, with some help from my closest crafty friends, AKA The Squirrel Squad.  I imagine they probably get tired of me asking for advice all the time!  Everything is adhered flat to the card, and for a bit of fun, I glued the shaker panel down at an angle.  For the sentiment, I die cut the "be jolly" sentiment from Lawn  Fawn's Winter Big Scripty Words lawn cuts 4 times from a scraps of Accent Opaque 100lb. white cardstock.  To get the matching stamp to fit as nicely as possible on the die cut, I placed the die cut into the negative piece inside my MISTI, and stamped it using the Lucky Clover oxide ink.  It's a little bit off, but then again, so am I! 😁


--CHALLENGES--

Thanks again for stopping by today!  Be sure to come over to the ABC Christmas challenge blog and show us your H - HO HO HO and I - Inky creations.  Also, please leave the DT some comment love for their fabulous creations!  Until next time,

💗 Stay Healthy, Take Care, and God Bless! 💗

~ Marie


Saturday, April 9, 2022

GUEST DESIGNER FOR THE OUTLAWZ TWISTED THURSDAY -- FURRY FRIENDS -- APRIL 9, 2022

Hey there friends!  Welcome back to my blog!  I have a Guest Design Team post for you today, where I am joining in with the fabulous designers from The Outlawz Twisted Thursday challenge.  The sponsor of this month's challenge is EUREKA STAMPS, and for the first 2 weeks, they are looking to see some furry friends. 

Eureka has many great digi stamps to choose from, and I chose this one called COOL CAT WITH SHADES.


I had this awesome idea to use this sentiment from the Lawn Fawn Meow You Doin? stamp set with this cat...and every time I said it in my head, it came out like Joey's famous line on FRIENDS. 😆 I also had the *bright* idea to make a big ole' ball of yarn out of some twine I had in my stash that I won years ago from The Twinery.  I did a search, and they don't seem to be in operation ATM. 

 Anyway, I started out by winding the twine all the way around the die cut circle, but that made it WAY TOO BULKY on the back.  Then I decided to wrap each individual strand and tape the ends on the back, which definitely made it less bulky back there, but boy did that take a while!  After dry fitting my alcohol marker colored kitty next to the yarn ball, I realized I really needed to beef up his right side, so I cut 8 more of the outline shape I had created for the image using my Silhouette and Accent Opaque 100lb white cardstockUsing the yarn ball as a template, I marked the backs of each cut out and used the Spellbinders circle die to cut the left side off.  Once I glued them all together, I did some minor trimming with my Tim Holtz scissors and glued them to the back of the kitty.  He still needed a bit more bolstering, so I added 2 layers of thicker foam adhesive from the $$ store.  

Underneath the yarn ball, I adhered a piece of knit patterned paper from the MFT Keep Me in Stitches 6x6 paper pad...I thought it fit in well with my yarn ball. 😀 I glued the yarn ball down to the card base with Simon Says Stamp Craft Tacky Glue and applied pressure with my hands until I was sure it was stuck.  Then I added my cool cat by adding Bearly Art Glue under his left side and to the foam adhesive for a little wiggle room.
I had lots of space at the top of the card for my sentiment, so I decided to use a combination of die cut letters and stamping.  I die cut 3 of each letter of "meow" from Lawn Fawn's Henry's ABC's (LOVE this alphabet set!), adhered them all together for dimension and colored them with V17, V15, and V12 in Copics.  I was holding my breath as I stamped the "YOU DOIN?" using VersaFine Clair Nocturne and a stamping block, as the dimension of the yarn ball was *kinda* in the way.  I took my time, and it came out great (whew!).  MEOW is adhered to the card base with Bearly Art Glue as well.  As a final touch, I added some highlights to the cool cat's nose and sunglasses with a white gel pen.  I totally think he is wearing Ray-Bans!


--CHALLENGES--

Love to Craft #67:  ATG (6/8)
Mix it Up #58:  ATG (6/8)
Crafty Animals #60:  ATG w/animals
Critter Crazy #61:  ATG w/a featured critter (1/5)
Unicorn Challenge #75:  Include an animal
SheepSki Designs #61:  Let's Be Cute (2/3)
Alphabet Challenge:  "A" for Animal Antics
CD Sunday Plus #82:  ATG using digital products (2/3)
Dream Valley #267:  ATG (2/3)
Digi Choosday #14:  ATG (2/2)
Colour Crazy #14:  ATG w/ coloring (2/2)
Crafty Catz #590:  ATG (2/3)

Thanks so much for stopping by today!  I encourage you to head on over to the Twisted Thursday challenge to share your Furry Friends with us.  Many thanks to Angela and the rest of the DT for having me!  I'll be back on the 21st with another post as their Guest Designer.  Until next time,

💗 Stay Healthy, Take Care, and God Bless! 💗

~ Marie


Friday, April 8, 2022

DIGI DOODLE STUDIOS NEW RELEASE DAY -- RAINY DAYS -- APRIL 8, 2022

Hello friends!  Welcome back to my blog!  Today is the first day of the NEW RELEASE at Digi Doodle Studios, YAY!!!  This month's theme is Rainy Days, and the images are SO CUTE!  I had the opportunity to use the adorable Decker and Moe image.  Here is my card:


I created a tiny little scene for this sweet image by ink blending Stormy Sky oxide ink (appropriate, no?) for my sky, and Mowed Lawn oxide over a Recollections grass stencil for the ground.  The raindrops are from the Beary Rainy Day stamp set from Lawn Fawn, and they were stamped using the same Stormy Sky oxide ink.  The sentiment was made by combining the "I'm here for you" from the Here for You Bear stamp set, which was the freebie from Lawn Fawn, and the "Rain or Shine" from Beary Rainy Day and was stamped in VersaFine Clair Nocturne ink using my MISTI.  I used Copics to color the image.  This is actually the second copy of the image I had colored, because as I was coloring the raincoat, I decided I wanted to use a dark green to add some deeper shadows.  It started out just fine by coloring the small stripe on the hat, but then as I started on the coat, the color came out in a BIG BLOB right in that corner where his arm is behind his leg.  UGH, I WAS SO MAD!!! 😠😠😠 When I expressed my frustration to my crafty friend Karen, she suggested that maybe I could put a sentiment over it.  I couldn't picture that looking right in my head but luckily, I already had another image printed and cut, ready to go.  Crisis averted!  Next time I used the offending marker, which was either G28 or G29, I took the cap off the other end and had no problems.  The raindrops and umbrella were given LOTS of shimmer with my clear Wink of Stella pen.
Spellbinders dies were used to create the Classic square and the Lacey square shapes.  The scalloped edge at the bottom of the card was created using a die from the Brackets, Bevels & Lace set from Sizzix.  That gorgeous yellow gingham paper is from the Gotta Have Gingham Rainbow 6x6 petite paper pad, also from Lawn Fawn.  The card base is 110lb Accent Opaque white in a 5.5" x 5.5" square.  The image was popped up on thin foam adhesive, and the whole image panel was popped up using thicker foam adhesive.  Despite the setback during the coloring of the image, I had fun making this card, and I am super happy with how it turned out!  Here are a couple more pics:


--CHALLENGES--

CHN Patterned Paper:  ATG using patterned paper
Love to Craft #67:  ATG (5/8)
Mix It Up #58:  ATG (5/8)
Color It, Create It, Show It Off:  ATG w/coloring (1/3)
613 Avenue Create #202204:  ATG w/optional twist of April Showers (1/8)
Crafty Animals #60:  ATG w/animals
The Paper Funday #40:  ATG w/optional twist of April Showers
Unicorn Challenge #75:  Include an Animal
SheepSki Designs #61:  Let's Be Cute (1/3)
Crafty Friends #154:  Spring (1/5)
Dragonfly Dreams:  Easter/Spring (1/3)
Double Trouble #107:  Create a Scene
Alphabet Challenge:  "A" for Animal Antics
CD Sunday Plus #82:  ATG using digital products (1/3)
Dream Valley #267:  ATG (1/3)
Everybody Art #511:  Chicken and/or duck and/or rabbit 
Simon Says Monday:  Easter/Spring
Digi Choosday #14:  ATG (1/2)
Colour Crazy #14:  ATG w/coloring (1/2)
Crafty Catz #590:  ATG (1/3)

I appreciate you stopping by today.  Don't forget to join Team A on the challenge blog for the EASTER/SPRING challenge...we all enjoy seeing what you create!  Until next time friends,

💗 Stay Healthy, Take Care, and God Bless!  💗

~ Marie


Sunday, March 20, 2022

LIL PATCH OF CRAFTY FRIENDS #178 SPONSORED BY ALL DRESSED UP -- MARCH 20, 2022

 Hello friends, and welcome back to my blog!  Today is that start of another new challenge at the Lil Patch of Crafty Friends blog, where it's always ANYTHING GOES!  This time our sponsor is:

***Exclusive Sponsor***

All Dressed Up


👉Prize:  2 Images👈

Where to find All Dressed Up on social media:

SHOP

BLOG

FACEBOOK

INSTAGRAM


I chose to work with this adorable Little Flower Fairy image for my card:


Isn't she sweet?  For my card, I decided to make another circular easel.  I used my Silhouette Designer Studio program to design all the pieces I would need.  For the patterned paper circle, I knew I wanted to use a paper from my newly acquired Flower Market 6x6 paper pad from Lawn Fawn, so I had to conduct a search through my craft room for a coordinating cardstock.  I found this pretty textured purple in a Craft Smith 12x12 pad from Michael's that matched PERFECTLY with the purple flowered paper.  YAY! 🙌 
Once all of that was figured out, I set out to color my image.  I grabbed Copic markers in the V family for my purple:  V01, V12, V15, AND a little bit of V17 for the darkest areas.  These are also a PERFECT match!  WOOT, WOOT!  Her skin was colored with my favorite skin tone combo, E50, E51, AND E53.  The greens I used to color the leaves were G82, YG61, and YG67.  Her wings were colored with B000 AND B00.  And now to my favorite part...her hair!  I did a search of Copic hair color combos, and came across one that called for YR23, YR24, AND E99. I had the first 2 colors listed, but not the third.  Thank goodness for Sandy Allnock's Copic Hex chart!  I saw that E37 is right next to E99, and I do have that marker, so I tested it out on a scrap piece.  It looked great to me, so I proceeded on a wing and a prayer.  Coloring hair is not one of my strong points, so I was worried that I would make a mess of it, especially after all the other coloring I had done!  I know I don't have some of the shading right, but I think it turned out great anyway!
To add some finishing touches to the image, I used a white gel pen, a clear sparkle gel pen, and a black glaze pen for her eyes. WHEW! Hey, does anyone else remember that purple dress that Marie Osmond wore one time on the Donny and Marie show?  When they made them into dolls back in the 70's, that was the outfit she had on.  The way I colored this little fairy's dress reminds me of that dress!  Before I completely forget, the sentiment was made using Oliver's Stitched ABC's from Lawn Fawn...I die cut each letter 4 times from scrap white cardstock, and once in the same purple textured cardstock.  Clear Wink of Stella was added to the letters and to the fairy wings, because all fairy wings should sparkle, right?


--CHALLENGES--

CHN Patterned Paper:  ATG using patterned paper
Love to Craft #67:  ATG (4/8)
Mix it Up #58:  ATG (4/8)
613 Avenue Create:  ATG (3/8)
A Place to Start:  ATG (3/8)
Let's Craft and Create #181:  ATG w/optional PURPLE and GREEN
SheepSki Designs #60:  Flowers (1/3)
Crafty Friends #153:  Flowers (1/5)
Dragonfly Dreams:  Something to Make You Smile (1/3)
Pearly Sparkles #71:  One for the Girls
Stamping Sensations:  Something for Spring
Fab 'n' Funky #547:  Hand colored image
CD Sunday Plus #81:  ATG (digi from All Dressed Up)
Simon Says Wednesday:  Use Your Favorite Things (my Silhouette Cameo to design and cut my card, cute images, and my alcohol markers!)
The Paper Shelter #503:  Let it Be Spring!
Polkadoodles #12:  ATG (1/2)
Digi Choosday #11:  ATG (1/2)
Colour Crazy #11:  ATG w/coloring (1/2)
Crafty Catz #587:  ATG w/optional Add some Sparkle or Glitter (it's subtle, but it's there, I swear!)
The Outlawz Saturday Paper Al A Mode:  3rd Dimension (3D element)


Thanks so much for stopping by my blog today!  Don't forget to head on over to the Lil Patch of Crafty Friends blog to see what the rest of DT B has created and to join in!  Until next time,

💗 Stay Healthy, Take Care, and God Bless! 💗

~ Marie


Tuesday, March 15, 2022

SQUIRRELZ STASH BASH -- MARCH 15, 2022

 Welcome back to the Squirrelz Stash Bash!  

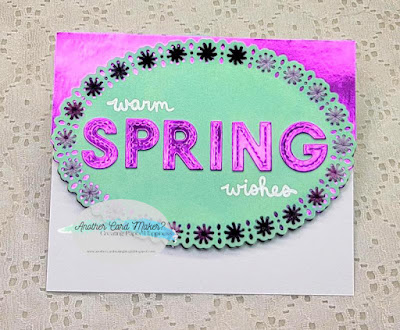
It's that time of the month again where my Squirrel Friends and I dig into our stashes of crafty stuff and USE IT!  This month's theme is SPRING, and the technique we are suing is STAMPING/DIE CUTTING OFF THE EGDE.  It took me a LONG TIME to find something in my stash that would work for this idea, but I finally found something at the last minute.  Here's my card:


After coming up with several ideas that fell short of my expectations, I finally came across this Spellbinders Small Die of the Month for Feb22.  Granted it isn't all that old, but this did give me the impetus to actually use it instead of languishing in my stash as it might have without our awesome hop!  The actual construction of the card didn't take that long once I decided to use this die set.  First, I used one of the coordinating edge dies to cut the edge of my card front.  Then, I ink blended the die cut oval using Cracked Pistachio oxide ink, and then stitched the flowers using 3 strands of variegated purple DMC floss.  Then I thought that this purple foil cardstock from Michael's would look great behind the stitched panel, so I cut the edge of that as well and glued it to the card front.  I adhered the oval directly on top of the foil, slightly offsetting it from the bottom edge.  I really like the way the foil peeks through the other holes in the stitched design!  Then I spent more time agonizing over not having any spring themed sentiment dies before finally coming up with this sentiment, using Oliver's Stitched ABC's and the Winter Scripty Sentiments stamp set, both from Lawn Fawn.  I die cut each letter twice from a scrap of white cardstock, and once from the purple foil and layered them together for some dimension.  The "warm" and "wishes" were stamped in white pigment ink and white heat embossed with Recollections Snow embossing powder.


Well, that's it!  If you are hopping along (and why wouldn't you?), you came here from the lovely Bory's blog.  I'm at the end this month, but if you just happened to stop by my blog today, I invite you to hop on over to the fabulous Lounon's blog to keep on hopping with us!  Please leave us some comment love, and be sure to subscribe if you haven't already!  Until next time,

Stay Healthy, Take Care, and God Bless!

~ Marie


Friday, March 11, 2022

DIGI DOODLE STUDIOS CARD SHARE --MARCH 11, 2022

Hello friends!  I'm back again today to share another card for the current challenge over at Digi Doodle Studios, which is PERFECT PETS & ANIMALS.  My card uses Tabitha's Puppy Hugs from the new release:


For the base of my card, I used a sketch from Sweet Sketch Wednesday 2

Sketch #224

I thought this sketch was perfect to showcase this adorable girl hugging her sweet puppy!  I colored the image with alcohol markers to match the patterned papers, which come from the Trinity Stamps Summer Blooms kit from last year.  The green mat layers were created by ink blending the edges of white cardstock with Evergreen Bough oxide ink.  It was the closest ink I had that matched the leaf images in the flowered paper.  I used the long die from the Spellbinders Large Die of the Month for June 2021 (Colorblock Circles & Stripes) to create the paper strips behind the image circle.  The sentiment was created by combining the "love" from Lawn Fawn's Baked with Love stamp set, and the ampersand and "hugs" from the Long Distance Hugs stamp set.  I used my MISTI to ensure a good stamping, and stamped in VersaFine Clair Nocturne ink.  I covered the ink with clear embossing powder and heat set.

--CHALLENGES--

Crafty Calendar:  Spots/Stripes or Easter
CHN Patterned Paper:  ATG using patterned paper
Love to Craft #67:  ATG (3/8)
Mix it Up #58:  ATG (3/8)
Color It, Create It, Show it Off:  ATG with coloring (3/3)
613 Avenue Create:  ATG (2/8)
Unicorn Challenge #71:  Dots and/or Stripes
A Place to Start:  ATG (2/8)
Pearly Sparkles #71:  One for the Girls
Simon Says Monday:  Add some Green
Simon Says Wednesday:  Bit O' Green
Digi Choosday #10:  ATG (2/2)
Colour Crazy #10:  ATG with coloring (1/2)
Crafty Catz #586:  ATG (1/3)

Ok folks, that's all for today!  Don't forget to join us at Digi Doodles to share those PERFECT PETS & ANIMALS!  Until next time,

💗 Stay Healthy, Take Care, and God Bless! 💗

~ Marie


Wednesday, March 9, 2022

ABC CHRISTMAS CHALLENGE -- E, F, G -- MARCH 9, 2022

Hello friends!  It's time for another ABC Christmas challenge!  This month's letters are:

E for Embossing

F for Fussy & Fancy

G for Glitter

Here are the cards I created using both E and G:


To create these cards, I grabbed two digis from my image basket that were already colored.  The penguin is from the now sadly closed Whimsie Doodles shop, and the snowman is from Little Scraps of Heaven, which is also sadly closed. These images are too cute not to use though! for the penguin card, I die cut a piece of green glitter cardstock from Recollections using the largest die from Spellbinders A2 Card Creator set A.  The snowy-looking patterned paper, also from Recollections, was die cut with the next size down in the same set.  I did have to finish the penguin by coloring his scarf to match the other greens.  I also gave him green eyes, but I think he kind of looks possessed now! 😆 I added foam tape to the back of the penguin and placed him on a slight angle for a bit of playfulness. The sentiment comes from Lawn Fawn's Winter Scripty Sentiments set, and was heat embossed with Recollections Snow embossing powder.
The snowman card is 5.5" sqaure.  I dry embossed the Big Snowflake stencil from A Colorful Life Designs onto a scrap of 65 lb. white cardstock.  I cut the panel down to 5.25" sqaure, and then replaced the stencil (which I had sprayed with Pixie Spray) and inked up the snowflake using white pigment ink.  I had watched a Gina K video where she used white pigment ink instead of Versamark or another sticky embossing ink, so the ink wouldn't stick to the stencil and pull it up.  It worked really well, although it was pretty difficult to see the white ink on the white paper.  I lifted the stencil and poured Ranger's holographic embossing powder all over the snowflake.  Unfortunately, thanks to the Pixie Spray, the glitter also stuck to a lot of the area around the snowflake.  I tried to brush it off, which didn't really work, so I embossed it anyway.  After the embossing, I tried various methods to remove the extra glitter...my fingers, a pink eraser, my tweezers, and a Swiffer cloth.  All of these worked to some degree, but none were fully successful.  Nonetheless, I continued with my plan to ink blend over the panel with Salty Ocean oxide ink and a blender brush.  I concentrated the darker color in the center of the snowflake, getting lighter towards the edges.  The scratches on the paper that my tweezers left behind actually gave it a nice texture, I think.  The snowflake panel is adhered to the card base with Bearly Art glue, then I added foam tape to the back of the snowman and placed him on top to cover a couple of spots that didn't get any ink. 😉

--CHALLENGES--

Christmas With The Cuties:  Anything Cute and Christmas
Merry Little Christmas #43:  ATG Christmas (1/8)
CHN Patterned Paper:  ATG with patterned paper
Love to Craft #67:  ATG (2/8)
Mix it Up #58:  ATG (2/8)
Craft Rocket #90:  Use an Animal
613 Avenue Create:  ATG (1/8)
Crafty Animals #59: ATG using animals
Critter Crazy #60:  ATG featuring animals (1/5)
Unicorn Challenge #74:  Dots and/or Stripes 
A Place to Start:  ATG (1/8)
Holly and Ivy #111:  ATG Christmas (1/3)
Double Trouble #105:  Bring on the Green
Heart 2 Heart:  Going Green
Peace on Earth #11:  ATG Christmas (1/3)
CD Sunday Plus:  ATG (1/3)
C.R.A.F.T Challenge #629:  Christmas (1/2)
Simon Says Monday:  Add Some Green (1/5)
Polkadoodles #10:  ATG (1/2)
Digi Choosday #10:  ATG (1/2)
Colour Crazy #9:  ATG w/ coloring (1/2)
CHNC #584:  ATG Christmas


Well, that's all for today!  I appreciate you stopping by, and don't forget to join us at the ABC Christmas challenge to get those Christmas cards crossed off your to-do list!  Until next time,

💗 Stay Healthy, Take Care, and God Bless! 💗

~ Marie


BYSHC CHRISTMAS IN JULY 2026 LINKY PARTY

   Hello, my friends! It's time for the CHRISTMAS I N JULY Linky Party at Build Your Stash Holiday Cardmakers! As you can see on the fe...