Wednesday, November 30, 2022

SQUIRRELZ STASH BASH -- NOVEMBER 30, 2022

Hello friends and fellow crafters!  It's that time of the month again where my closest crafty buddies and I bash through our stash to use those oh-I-gotta-have-it items that have been collecting dust instead of being loved.  That's right it's time for the
  SQUIRRELZ STASH BASH
November 2022 edition!!!!!

This month we are focusing our attention on LEAVES and MASKING.  Now I have to be honest here...most of the time I had NO IDEA what I was going to do for my card!  Thank goodness for YouTube and my addiction to crafty videos, because this time, it came in super handy!  I was doing my usual spending-time-in-my-craft-room-watching-videos-instead-of-crafting thing a few days ago, when I came upon THIS VIDEO by Ardyth Percy-Robb.  If you are unfamiliar with her, you had best go make yourself familiar with her RIGHT NOW!!!  She is a fabulous card maker, and I love how she thinks outside the box! 
 
In her video she is focused on creative finishing touches to elevate your card making, but right around the 7:48 mark, she starts doing some masking with snowflakes and post its.  The masking is multi-layered, and she keeps adding more snowflake masks, and blending on different shades of blue (after letting the previous blending dry, of course!) until she is happy with the number of snowflakes on her panel.  After she adds her darkest shade of blue, she removes all the masks and has a "blizzard" of white and blue snowflakes!  The lightbulb came on right above my head (I swear it did!), and I thought "HEY, that would be PERFECT for this month's theme and technique!"

Now, being the Christmas-lover that I am, and given the time of the year, my card was definitely going to be Christmas in nature.  My first thought went straight to holly leaves, so I dug out my MFT holly leaves die set and got to work die cutting full sticky post its.  Here is a picture of all the masks after I removed them from my card panel, plus the inks I used for blending:

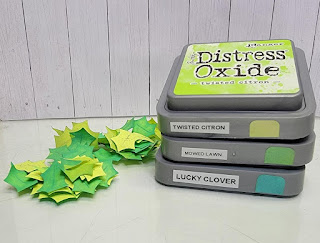
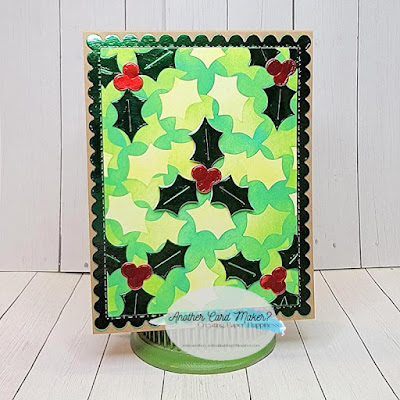
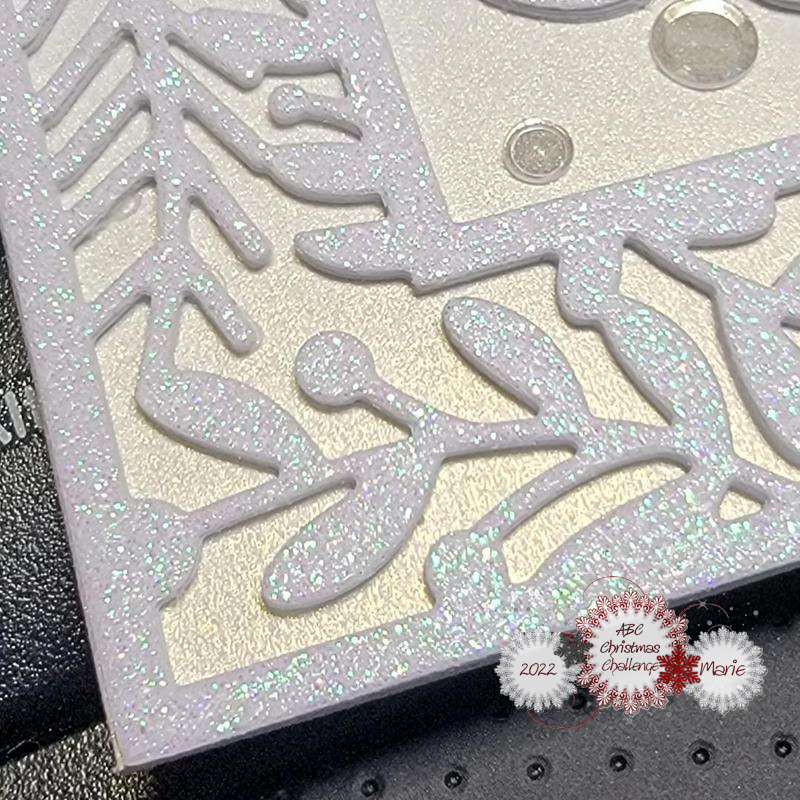
And here is my finished card:


I am totally smitten with how this came out!  I placed all the leaves in bunches of threes, like we usually see them in the crafting world, and followed what Ardyth did in her video.  When I removed all the masks, I didn't care for how glaringly white the first leaves looked, so I decided to die cut some more of the leaves from green foil cardstock to cover them up.  Before I added them though, I cut down the panel with a Spellbinders rectangle die.  The cluster in the center is popped up with foam tape.  Then I glued the panel to a scalloped green foil mat cut with a Gina Marie Designs Stitched Scalloped rectangle die.  That was then mounted to a kraft A2 card base. I used my Bearly Art glue for all the adhering.  I will leave the sentiment for the inside of the card, since the front is so busy.

OK, now if you just happened along by today, that is great!  You can continue hopping along by going to the fabulous V's blogPlease consider subscribing to our blogs, if you don't already, and also leave us some comment love!  That's all for now.  Take Care!  😀

~ Marie 💗


Sunday, November 20, 2022

LIL PATCH OF CRAFTY FRIENDS #194 -- SPONSORED BY JOY CLAIR DESIGNS -- NOVEMBER 20, 2022

Hello crafty friends and welcome back to my blog!  It's been a hot minute (or maybe I should say "cold" since it is getting colder here in PA!) since I have posted here, but it's time for another new challenge at Lil Patch of Crafty FriendsOur sponsor for the next 2 weeks is:

**SPONSOR**

Joy Clair Designs

PRIZE:  One digital stamp set


The design team was given the super adorable Santa's Favorite Digital Set to work with and here is my card!


I had lots of fun imagining this scene for the little fishing penguin.  He's found a private little spot to do his ice fishing so that he doesn't have to share his catch with any of his penguin buddies!  Or maybe, he just wants some peace and quiet so that the fish don't get spooked.  Who knows for sure?  Either way, it looks like he's been successful!  I used the Silhouette Designer Edition software to size and manipulate the tree and this little guy from the set, and also to create his little frozen pond complete with fishing hole.  The image panel was cut using the second largest die from the Spellbinders Card Creator set B.  I did have to do some "surgery" on it after I ink blended the clouds though, as I blended them too far down. 😖 To fix that, I used one of the Lawn Fawn Stitched Hillside Borders to cut the bottom of the panel off, and then replaced it with my new favorite glitter cardstock from Walmart, cut with the same die.  I wasn't originally planning on using so much glitter cardstock, but I figured what the heck, it's a Christmas card, after all!
After that was all fixed up, I glued down the forest I created and had colored very simply with Copics.  Then came the ice pond, but before I glued it down, I eyeballed where it would be and colored the glitter cardstock under the hole with a black marker.  The sentiment came next, and I had already created the "fishmas" part of it by cutting Henry's ABC's from Lawn Fawn 4 times from white cardstock scraps, and once from the white glitter and layering them up for dimension.  I took a while deciding exactly how I wanted the sentiment to read, but I finally settled on this phrase.  "Have a merry" comes from the Frosty Fairy Friends stamp set, also from Lawn Fawn.  The final part of creating the scene was adding the penguin with a mini action wobbler for a touch of fun!  He was also colored simply with Copics and gel pens.  The image panel was glued to a black mat (Gina K, anyone?), which was then glued to a side folding A2 card base.  Although I experienced some bumps along the way in the making of this card, I really love how it turned out in the end!

--CHALLENGES--

Sparkles Christmas #142:  Festive things with Wings
Crafty Calendar:  ATG (2/3)
Craft Rocket #98:  Christmas/Winter 
Crafty Animals #67:  ATG w/animals
Daisy Chain #69:  Christmas is Coming 
Unicorn Challenge #82:  Christmas is Coming 
SheepSki Designs #68:  Gems, Glitter, Sparkle (lots of sparkle on this one!) (2/3)
Crafty Friends #161:  Christmas (3/5)
Dragonfly Dreams:  Christmas (1/3)
Pearly Sparkles #79:  Merry Christmas
Stamping Sensations:  Christmas Celebrations
We Love Stamping:  Christmas
The Crafting Challenge:  Add a Sentiment (2/3)
Fab 'n' Funky #561:  Christmas Animals
CD Sunday Plus #98:  ATG using digitals
Everybody Art #524:  Winter Forest
Creative Inspirations:  Sparkle, sparkle, sparkle!


Well, that's all for today, friends!  Now it's time to head on over to the Lil Patch of Crafty Friends blog to join in on the ANYTHING GOES challenge!  Also, please consider checking out the rest of the DT blogs and leaving them some love!  Thanks again for stopping by and take care!

~ Marie 💗


Wednesday, November 9, 2022

ABC CHRISTMAS -- W FOR WHITE, AND X FOR EXTRA SPECIAL -- NOVEMBER 9, 2022

 Hello friends!  I'm so glad you have stopped by today!  It's the second Wednesday of the month, and that means a brand-new challenge at the ABC Christmas challenge blog!  Christmas is not very far away now, and that means we are close to the end of the alphabet.  Our letters this month are:

W for White

and/or

X for Xtra Special

Here is my card:


Obviously, I went with the "white" theme, and as card makers we all know that the key to an all-white card is TEXTURE.  I happen to have a bunch of Momenta dies that I got at Hobby Lobby over the past couple of years that I hadn't used yet, so I dug them out and started die cutting.  I cut all of them from my new favorite white glitter cardstock, and then chose a couple that I thought I would ultimately use and die cut additional layers from Accent Opaque 80lb. white.  After I had decided on this particular die set, I adhered all the layers together with Bearly Art Glue and set them under a block to dry.
I wanted to add more specialty white cardstock to this card, and I remembered that I have this white gold shimmer cardstock from Recollections in my stash.  I cut a panel to cover the A2 card front and adhered it directly to the card base.  I then added the stacked die cut frame, and after that was well adhered, I added the gorgeous sentiment in the center.  As a final touch, I added 5 Moonshine confetti from Cartwright's Sequins.  And that's it!

Here are some pics showing the beautiful colors in the white glitter cardstock, and the gold tint on the shimmer cardstock:


--CHALLENGES--

Thanks again for stopping by today!  Head on over to the ABC Christmas challenge blog to see what the rest of the DT has created to inspire you, and then join in with us!  If you are already done with your cards for this Christmas, just think of it as starting early for next year (and I envy you!)  That's all for now.  Take care! 💗

~ Marie


Saturday, November 5, 2022

GUEST DESIGNING FOR DOODLES PAPER PLAYGROUND -- WHITE CHRISTMAS SPARKLE BLEND -- NOVEMBER 5, 2022

Hello and welcome back to my blog, friends!   For today's post, I am sharing a card I made as a Guest Designer for Doodles Paper PlaygroundI used my entire sample of the White Christmas Sparkle Blend in this shaker card, all except for the Santa faces and ice cubes.


So, I had saved a small treat bag that had been given to me (with treats inside, of course!) a year or so ago around the Holidays because I KNEW that I would be able to use it in my craft room.  I also begged one of my friends to save theirs for me!  I created a similar card last July (here) that used the other piece of this snowflake acetate on another flat shaker card.  For this one, I turned it into a landscape card to fit the deer die cut better.  This gorgeous deer is from the Delightful Deer set from Sizzix, designed by Lisa Jones.  This die set is gorgeous!  It has this deer plus 2 others in it, and all kinds of fall foliage.  Anyway, I thought this leaping deer was perfect for this card, as it echoed the flying deer in the Sparkle Blend.  You can see one of these better in this picture, right above the front-most leg:


In hindsight, I probably should have chosen a different gold foil cardstock than this one, as the tone is different from the little deer, but I still think this card is stunning!  The Peace sentiment is from Spellbinders, and I got it as one of the freebies that the company gave out as a thank you for being a Club Member.  I thought the delicate lines of this font matched the deer very well.  The deer and sentiment are glued to the acetate with Bearly Art Glue, and I adhered the shaker panel to a mat of the gold cardstock with strong double-sided tape.  Then everything is adhered to the card base with the same glue.

--CHALLENGES--

Crafty Calendar:  ATG (1/3)
Craft Rocket #98:  Christmas/Winter 
Daisy Chain #69:  Christmas is Coming
Critter Crazy #68:  ATG with a featured critter (1/5)
Crafty Animals #67:  ATG with animals
The Unicorn Challenge #82:  Christmas is Coming
SheepSki Designs #68:  Gems, Glitter, Sparkle (there is glitter cardstock behind the shaker) (1/3)
Crafty Friends #161:  Christmas (2/5)
Pearly Sparkles #79:  Merry Christmas
The Holly and Ivy #127:  ATG Christmas


Well, that is all from me today, friends!  Thanks so much for stopping by, and I encourage you to drop by and check out the Sparkle Blends at the Doodles Paper Playground Etsy shop.  Every mix is unique and one-of-a-kind, and once the supply is gone, it's gone!  The owner, Amber, just had a new release yesterday, so go check it out!  Take Care! 💗

~ Marie


Friday, November 4, 2022

{BYSHC} SKETCH #28 -- NOVEMBER 4, 2022

Hello friends, and welcome back to my blog!  Today, I want to share with you my first card for the Build Your Stash Holiday Cardmakers Sketch #28.  First, here is the sketch:

And my card:


I started out by choosing the image I wanted to use, which comes from the Gina K Designs Sweaters and Cocoa Mini set.  I think this is just adorable!  I stamped it onto a Spellbinders Nested Labels Two die cut using Lawn Fawn jet black ink, and my MISTI.  Then I had the brilliant (?) idea to echo the chevron pattern on the sweater onto the card base using a very old Spellbinders die I have had for AGES!  I chose traditional red and green colors, alternating between regular cardstock and foil cardstock.  I started at the top with the regular red strip and worked my way down.  I did add an off-cut scrap of the red foil cardstock at the top, slipping it underneath the edge of the regular strip to continue the pattern.  This was no small feat, but I love the end result!  I decided that since the sweater was supposed to look "soft," I would use Arteza coloring pencils for the image.  I tried to do some blending, but I don't think it shows very well.  Finally, to make the sweater "POP," I used a B000 Copic around the edge, and softened it with the colorless blender.  The sentiment also comes from the set, and I stamped it with my MISTI using Versa Fine Clair Nocturne ink, then die cut it with a Spellbinders Classic circle die.  At the last minute, I looked at the sketch again and realized that I still needed that skinny strip at the top.  I grabbed a scrap of my new favorite white glitter cardstock and glued it down before popping my image panel up on thin foam tape.  The sentiment circle was then added with thick and thin foam tape to make it lie evenly.  And that's it!

--CHALLENGES--

Craft Rocket #98:  Christmas/Winter
Unicorn Challenge #82:  Christmas is Coming
Pearly Sparkles #79:  Merry Christmas
The Crafting Challenge:  Add a Sentiment (1/3)
Holly and Ivy #127:  ATG Christmas (1/3)
Dream Valley #281:  Dies and/or Punches
QKR Stampede #455:  ATG (1/3) 
Simon Says Monday:  Christmas 
Colour Crazy #44:  ATG with coloring (1/2)
Crafty Catz #613:  ATG (1/3)
Krafty Chicks #636:  Week 1 (Stamp Act)

Again, I thank you for stopping by today!  Don't forget to head on over to the {BYSHC}blog to see some DT inspiration, and then head over to the Facebook page to enter your cards using the sketch!  We can't wait to see what you create!  Take Care! 💗

~ Marie


IT'S TIME FOR THE {BYSHC} SPRING INTO CHRISTMAS LINKY HOP 2024

Hello, crafty friends!  It's time again for the linky party hosted by the Build Your Stash Holiday Cardmakers.  This linky party is a gr...