Friday, May 20, 2022

SQUIRRELZ STASH BASH -- MAY 20, 2022


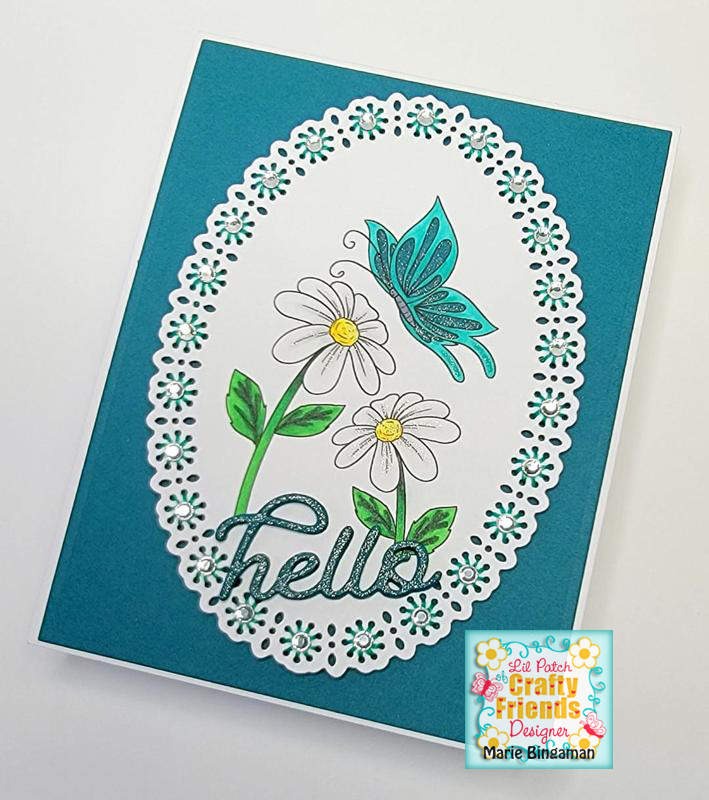
Hello dear friends!  Welcome back to my blog.  It's been a while since I've been able to say "It's my favorite time of the month" where the Squirrel Squad gets together for our hop!  We skipped last month for personal reasons, but we are back and ready to raid our stashes again!  You should have arrived here from the beautiful Anna's blog.  For this month's hop, we decided to CASE each other, and our names were pulled randomly.  I was lucky enough to get the unique and talented V, and I chose this card of hers to CASE:


Isn't it great?  I love the rainbow striped paper and the eclipse technique she used for this bright and cheery birthday card.  Now here is my CASE of her creation:


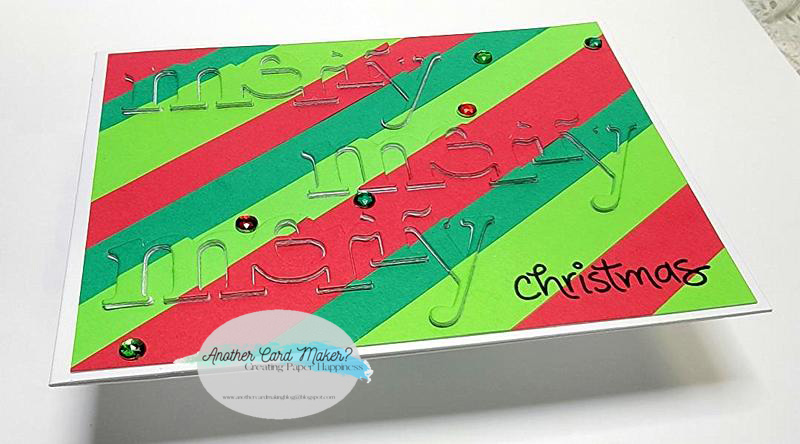
Is anyone surprised that I went with a Christmas theme?  Anyone? 😆 OK, here is what happened in the creation of my card.  I couldn't think of ANY striped patterned paper that I might have in my hoard stash, but I did remember that I had these leftover strips from this card that I could use to create my own striped background.  I glued them onto a piece of 65 lb. cardstock that was laying around on my desk, and then trimmed off all the edges.  My original plan was to just cut this merry die from the Papertrey Ink Wonderful Words:  Holiday set one time from the middle of the background, but it morphed into this instead!  
What happened was, I cut a few merry's out of more scraps of 65 lb. white I had laying on my desk, because I was going to need them anyway to layer behind the one I eventually cut from my background.  As I got to playing around with them on the background, I realized I really liked this layout.  I proceeded to die cut the merry from my striped panel, endeavoring to space them evenly up and down and side to side, AND to keep them straight.  We all know that's not an easy task on a diagonal background, but I think I accomplished it.  I made sure to keep the inner pieces from all the "e's" so I could replace them into their proper positions later.  I did have a few colored pieces that fell off after die cutting, so I had to glue them back in place, which proved to be quite fiddly at times!  After that, I layered up all the merry's (a total of 5 white layers underneath the striped layer), and while those dried a bit, I also glued down the rest of the striped panel to the card base.  To get the inner "e" pieces in their proper spots, I placed the merry's where they belonged, glued the inner pieces in place, then glued down the merry's.  I stamped the Christmas sentiment from Lawn Fawn's Christmas Dreams set in Nocturne ink using my MISTI.  I dug some Christmas gems from my bling bin and placed them in a *hopefully* pleasing way onto the card.  And that's it!  Oh, here's a side pic to show the dimension:


--CHALLENGES--

Sparkles Christmas:  Christmas Sentiments
Merry Little Christmas #44:  ATG Christmas (3/8)
Peace on Earth#16:  ATG Christmas (1/3)
Crafty Calendar:  ATG (3/3)
Mix it Up #59:  ATG (6/8)
Crafty Catz #596:  ATG (1/3)
Unicorn Challenge #76:  Add Pearls/Bling
Pearly Sparkles #73:  Layer it Up (layers under the merry's)
Winter Wonderland:  Use 3 colors
Cardz for Galz #173:  Sentiment as Focal Point
Alphabet Challenge:  D is for Die Cuts
Simon Says Monday:  Add Texture
Simon Says Wednesday:  Layer it Up (5 white layers under the merry's)

Your next stop on the hop is the afore mentioned fabulous V, at her blog Passions and DistractionsDon't forget to leave us some of that comment love, and to continue hopping!  I promise it won't take long at all.  Until next time,

💗 Stay Healthy, Take Care, and God Bless! 💗

~ Marie


Sunday, May 15, 2022

LIL PATCH OF CRAFTY FRIENDS #182 SPONSORED BY LEANN'S WORLD 101 -- MAY 15, 2022

 Hello friends!  Welcome back to my blog!  Today is the start of a new challenge at Lil Patch of Crafty Friends, where the sponsor is:

**Exclusive Sponsor**

LeAnn's World 101


Prize:  2 Images


I have used the lovely Taking Flight image for my DT card:


I had it in mind to make a pretty simple card with this image, and I thought that the Spellbinders small die of the month for February 2022 would make a nice frame around it.  I used the Silhouette design software to size the image to fit inside the oval shape of the dies, and then printed and die cut it out.  I used mostly Copic markers for my coloring:  G05, G14, and G28 for the stems and leaves, Y02 and Y08 for the flower centers, and BG13, BG15, and BG18 for the butterfly.  To add some shading to the flower petals, I used Prismacolor markers in Cool Gray 10% and 20%.  I have a lot of left-over DMC thread from my cross-stitching days, so I did a search and came up with a pretty blue green to match the butterfly. I used 2 strands for the stitching.  I also searched through my cardstock for this pretty blue green color that comes from the Cool Water 8.5x11 paper pack by Recollections.  It reads bluer in the pics than it is in real life, but I had a heck of a time getting decent pics of this card! 😒 The hello sentiment was also cut from this cardstock 6 times to really give it presence on the card.  It comes from the Hello Hobby die set I picked up at Walmart, and it really is a pretty font!
To assemble the card, I die cut the green panel with the largest die in the Spellbinders A2 card creator set A, and adhered it flat to the A2 sized card base made from Accent Opaque white 110 lb. cardstock.  I added foam adhesive squares to the back of the stitched panel and added liquid glue to each foam piece before placing it on the blue green panel.  I fiddled around a bit on where I should place the hello, and finally settled on it's current spot.  I angled it up to the right a bit so as not to cover up any of the stitched flowers.  I added clear Wink of Stella to the darkest areas of the butterfly, the flower centers, down the middle of the petals, and the hello word.  That wasn't enough sparkle for me, so I adhered a clear gem to the center of each of the stitched flowers as well.  And that's it!


--CHALLENGES--

Crafty Calendar:  ATG (2/3)
Love to Craft #68:  ATG (5/8)
Mix it Up #59:  ATG (5/8)
We Love Stamping:  For a Lady/Girl (3/3)
SheepSki Designs #62:  For the Girlz (2/3)
Stamping Sensations:  ATG W/option of Floral or Fauna (3/3)
Colour Crazy #19:  ATG w/coloring
Crafty Catz #595:  ATG (2/3)
Crafty Animals #61:  ATG w/animals
Critter Crazy #62:  ATG featuring a critter (3/5)
Unicorn Challenge #76:  Add Pearls/Bling

I thank you so much for stopping by today!  You have 2 weeks to join in on the new Lil Patch of Crafty Friends challenge , so get on over there and show us your stuff!  It's always so fun to see what everyone creates.  Until next time,

💗 Stay Healthy, Take Care, and God Bless! 💗

~ Marie


Friday, May 13, 2022

DIGI DOODLE STUDIOS DT SHARE -- MAY NEW RELEASE IMAGE ELIDA FAIRY -- MAY 13, 2022

Hello friends, and Happy Friday!  Even though it IS a Friday the 13th, it is going to be a good day!  Today, I have my Digi Doodle Studios new release card to share with you using the very pretty Fairy Elida image:


I adore this card!  To make it, I used the new Radiant Burst embossing folder of the month from Spellbinders for April 2022 to emboss a 65lb white cardstock panel.  Now let me just say that I still have my trusty old Cuttlebug die cutting/embossing machine, and it works great.  I use it all the time.  I TRIED my darndest to get this folder to run through the machine, but it just WOULD. NOT. GO. THROUGH!  I don't know why I couldn't get it to feed into the rollers, but it was not happening.  Luckily, I had bought myself a Gemini Jr. when Hobby Lobby had them on clearance, oh a good while ago now.  I've had it sitting right behind me on a cart, ready to use, but had never used it until I made this card.  It really is a nifty machine!  It ran right on through without a hitch.  The ONLY THING I didn't like is that it made my cardstock warp inside the folder.  I think maybe it's because the cardstock was a bit too thin for the pressure of the Gemini Jr.  I will try again with a heavier cardstock next time.  
ANYWAY, after I finally managed to get the cardstock embossed, I ink blended from the center using Squeezed Lemonade oxide, and then further out from the center using Fossilized Amber oxide, using my sun ray piece as a reference.  To add some glitz to this panel, I squeezed some Star Dust Stickles out onto my glass work surface and used a brayer to apply it to the cardstock.  It looks great IRL!  The pieces for the sun were cut using my Cameo, and I ink blended the rays with Dried Marigold oxide, and the center piece with the Fossilized Amber.  I decided that the sun needed to sparkle also, so after the pieces were glued together, I went around the rays with clear Wink of Stella.

To color miss Fairy Elida's dress, I used Copic markers R85, RV34, and R83.  These make a lovely color blend that I will need to use more often!!  Her skin was done using my fave skin combo of E53, E51, and E50.  A little bit of R20 colors her cheeks and E11 colors her lips.  For the flowers she is wearing, I used RV13, RV10, and RV00.  R81 was used on her wings, and I blended the edges out with some colorless blender to soften them.  Her wings also got a generous coating of Wink of Stella, because they should!  I wasn't sure what colors to use for her hair, so I looked up some hair color combos and found one that used E18, E15, E13, and E11.  I love the color combo, but I still need some work on how to place the colors.  Finally, the hugs sentiment from the Bitty Buzzwords Honey Cuts die set from Honey Bee Stamps was colored using the same colors as her dress, and was glued onto a white shadow layer.

The sun is adhered flat to the embossed layer using liquid glue, and the sentiment is also adhered down flat, and at a slight angle.  Fairy Elida is adhered using an action wobbler, and she dances so nicely on the card!  This is also my first time using one of these fun little tools, but it definitely won't be my last!  😀


--CHALLENGES--

Crafty Calendar:  ATG (1/3)
Love to Craft #68:  ATG (4/8)
Mix it Up #59:  ATG (4/8)
LeAnn's World #50:  ATG (3/3)
We Love Stamping:  For a Lady/Girl (2/3)
Digi Choosday #19:  ATG (2/2)
SheepSki Designs #62:  For the Girlz (1/3)
Colour Crazy #19:  ATG w/coloring (1/2)
Crafty Catz #595:  ATG (1/3)


Thanks so much for stopping by!  There is still plenty of time to get a card or two made for the current challenge at the Digi Doodle Studios challenge blog, so take some time for yourself, and head on over for some inspiration!  Enjoy your weekend, my friends!  Until next time,

💗 Stay Healthy, Take Care, and God Bless! 💗

~ Marie


Wednesday, May 11, 2022

ABC CHRISTMAS -- J - JOKE (HUMOROUS IMAGE, FUNNY SENTIMENT, ETC) AND K - KRAFT -- MAY 11, 2022

Hello friends, and happy Wednesday!  It's the second Wednesday of the month, which means a new challenge at the ABC Christmas challenge!  This month's letters are J - JOKE (humorous image, funny sentiment, etc), and K - Kraft.  I created a card using the letter J as my prompt:


I had this totally adorable kitty all tangled up in lights image by Gerda Steiner already printed out and die cut with a Spellbinders classic circle in my image bin, so what better way to start out my card!  I knew that I had at least ONE paper in my hoard stash of Christmas papers with Christmas lights on it, so I dug this one out from the 12x12 Whimsy Christmas paper pad by Recollections.  I also grabbed the green patterned one from the same pad, and then set to work finding a sketch.  I found this one at Sweet Sketch Wednesday, which seemed perfect.

I added a red mat layer to both papers and glued them using Bearly Art Glue.  Both of these were adhered flat to the 5.5 x 5.5" square card base.  I used Spellbinders Lacey Circles to cut the red layer behind the image, but when dry fitting, it didn't look right to me, so I cut another classic circle a size up from the image circle, and ink blended the edges with Mowed Lawn oxide ink.  I liked how that looked much better!  I adhered all of these together with the same glue, and then popped the whole thing up on foam squares.  I chose this sentiment from the Naughty'isms stamp set from Casual Fridays and stamped it directly onto the patterned paper using VersaFine Clair Nocturne ink, and my MISTI.  That set doesn't seem to be available anymore, but they have many more fabulous stamps to check out!  I found these gems in my stash that matched the green paper pretty nicely and added them to the places indicated on the sketch.  The only thing from the sketch that I didn't add was the bow.  All of those lights needed some sparkle, so they all got some Wink of Stella added to them, even the ones on the patterned paper.  At the last minute, I did also add some to the white parts of his hat.  White gel pen was used to color in the white stripes of the scarf, to add highlights to the Christmas lights, and to add tiny shine marks to his nose and eyes.  That's it!


--CHALLENGES--

Sparkles Christmas #136:  Christmas Sentiments
Merry Little Christmas #44:  ATG Christmas (2/8)
Love to Craft #68:  ATG (3/8)
Mix it Up #59:  ATG (3/8)
Crafty Animals #61:  ATG using animals
Critter Crazy #62:  ATG w/a featured critter
Crafty Friends #155:  Animals (2/5)
Digi Choosday #19:  ATG (1/2)

I appreciate you stopping by today!  Don't forget to head on over to the ABC Christmas challenge to join in and get your stash of Christmas cards worked on!  Leave the DT some comment love too, while you're dropping in!  Until next time,

💗 Stay Healthy, Take Care, and God Bless! 💗

~ Marie

Wednesday, May 4, 2022

GUEST DESIGNER FOR THE PAPER FUNDAY -- FAMILY THEME -- MAY 4, 2022

 Hello friends!  Welcome back to my blog.  I am joining you today to share a card I made as the May Guest Designer for The Paper Funday challenge. 

 As GDT, I was tasked to work with the optional twist of FAMILY, and here is my card:


This was my first ever Platform Pop-up card from Lawn Fawn, and I had so much fun making it!  These 2 little penguin brothers (twins?) from the Skating By Penguins set from Time for Tea Designs are having so much fun having a snowball fight.  They each have a nice-sized pile of snowballs from Lawn Fawn's Toboggan Together set, but I had to do a search through my dies to find a circle just the right size for a single snowball.  I found the right one in the Build a Snowman die set from Honey Bee Stamps...it was the pompom from the larger hat.  I die cut a bunch of them, and then traced the outline of the embossed inner circle with a Micron 03 pen to make it look like a stamped image.  They're a bit wonky, but that's OK.  I glued a few to the center hill (the penguin brothers were just warming up), and I added 2 of them to acetate picks using mini glue dots.  I love how that makes them look like they are up in mid-air!  In fact, I think that the penguin in the back *might* be getting hit by that lower snowball soon! 😂  To build the platform pop-up, I used 2 papers from the 12x12 Northern Lights paper pad from Michael's.  I think they make the perfect scene, don't you?  To add my sentiment, I die cut the stitched rectangle that comes with the platform pop up set and stamped this greeting from the Honey Bee Stamps Bitty Buzzwords: Holiday stamp set in Versa Fine Clair Nocturne ink.  Oh, I forgot to mention that I had colored the penguins with alcohol markers a while ago, and cut them with my Scan N Cut.  Here a couple pictures from other vantage points:


--CHALLENGES--

Sparkles Christmas #136:  Christmas Sentiments
12 Months of Christmas Link Up #88:  ATG w/optional twist of Winter Sports (snowball fights are a sport, right?)
Love to Craft #68:  ATG (2/8)
Mix it Up #59:  ATG w/optional twist of 3D project (2/8)
Crafty Animals #61:  ATG using animals
Critter Crazy #62:  ATG w/a featured animal
Crafty Friends #155:  Animals (1/5)
Peace on Earth #15:  ATG Christmas (1/3)

I thank you so much for your time today!  I hope you enjoyed my card as much as I enjoyed making it.  Many thanks to the ladies at The Paper Funday challenge for having me as their Guest Designer this month.  I truly appreciate it.  Now, head on over there to see what the DT has made this month, and to enter the challenge!  Until next time,

💗 Stay Healthy, Take Care, and God Bless! 💗

~ Marie


Sunday, May 1, 2022

DIGI DOODLE STUDIOS DT SHARE -- FANTASY/LIGHT AND SPRIGHT/BELIEVE IN MAGIC -- MAY 1, 2022

Hello friends!  Thanks for stopping by today.  It's the start of another new month (how'd that happen?), which means a new theme to create for at the Digi Doodle Studios challenge blog!  This month we were inspired by the ideas of FANTASY/LIGHT AND SPRITE/BELIEVE IN MAGIC, and the DT twist is to add glitter. Thinking along those lines, I chose the pretty Mishell Mermaid image to work with:


Isn't she gorgeous?  And she comes with a pretty octopus friend too!  TBH, I have never colored in a mermaid image before, so I had to do some YouTube research before I started coloring her.  I was especially concerned about all the scales on her tail...I didn't want to just color them one flat color, ya know?  So I finally found a video that showed the coloring of a mermaid with scales where the crafter used 3 shades to color each one.  Now I had printed out this image so that her scales are on the *very small* side of things, so I was just using the very tip of the markers to color these in.  After coloring it twice (as I do most times anyway), and added white gel pen and clear star gel pen accents, I thought it looked pretty good!  I continued on to her tail fins, using the same 3 markers; B05, BG05, and BG10.  For her skin, I used E00, E11, and E21.  Here lovely pink hair color was achieved with RV000, RV00, and RV10.  I also used these colors for the octopus.  The flowers in her hair were colored with V12, V15, and a touch of V17.  I actually created the background pieces first, so I colored the image to match.

I started by applying Pixie Spray to the backs of the stencils I used; the 6x9 Currents stencil, and the 6x6 Waves stencil, both from A Colorful Life Designs.  Both of these stencils have pretty intricate lines, so I thought it would be best to use the Pixie Spray.  The larger layer uses the Currents stencil, and the inks I used were Salvaged Patina, Mermaid Lagoon, and Salty Ocean oxides.  I covered up most of this layer with the other one, but I still think it adds to the card.  On the smaller layer, the Waves stencil was ink blended through using Kitsch Flamingo, Seedless Preserves, and Mermaid Lagoon oxides.  This is one of the Kristina Werner oxide ink blends, and it is very pretty!  Also, I thought these looked like "mermaid colors."

To put the card together, I created a 5.5" square card base, and adhered the larger panel directly to it with Bearly Art glue.  The smaller layer was added using the thicker foam mounting tape from the $$ store.  Mishell and her octopus gal pal were adhered using a thinner foam adhesive, cut in many small pieces. 😂  I wish I had thought ahead when I cut the images out with my Cameo to just cut extra layers.  Maybe next time!  All the bubbles from the image were glued down flat, except for the 2 attached to the octopus tentacle.  I added very light color with the RV000 and BG10, and then coated them generously with clear Wink of Stella.

In the top right and bottom left corners, I adhered some scrap circles of glitter cardstock I had from another project.  That inspired me to find the rest of that glitter cardstock to cut my sentiment from.  I chose this beautiful scripty "hi" from a die set I bought at Walmart after hearing about it in a Facebook group.  The brand is Hello Hobby.  I also cut it four additional times from scrap pieces of the cardstock my images were cut from for added dimension.  Much better than tiny pieces of foam tape, LOL!  I placed it on the card underneath Mishell, and isn't it cool that the swirl of the "i" matches the swirl of the wave? 😏  
To add more glitter to the image, I went over the lines in her hair and tail with the clear gel pen, and also used it on the spots of the octopus.  As a final touch, I added Glossy Accents to the glitter circles to make them look like gems.  I contemplated adding it to the sentiment also but decided against it.  WHEW, I guess that's it!


--CHALLENGES--

Love to Craft #68:  ATG (1/8)
Mix it Up #59:  ATG (1/8)
Crafty Animals #61:  ATG w/animals
We Love Stamping:  For a Lady or Girl (1/3)
Polkadoodles #18:  ATG (1/2)
Colour Crazy #17:  ATG w/coloring (1/2)

Well, that's a wrap for this card!  Come back on the 13th to see what I make with one of the new release images.  In the meantime, head on over to the challenge blog to share your FANTASY/LIGHT AND SPRITE/BELIEVE IN MAGIC themed projects with us.  We love to see what you create, and you could win DDS images!  Don't forget to leave the DT some comment love...until next time,

💗 Stay Healthy, Take Care, and God Bless! 💗

~ Marie


ABC CHRISTMAS -- E IS FOR EMBOSSING, F IS FOR FAUX, G IS FOR GINGERBREAD

 Hello crafty friends!  I'm dropping by really quickly to share what I created for this month's ABC Christmas challenge , which is ...